Today’s episode of Research Like a Pro is about how to use RootsFinder, a family tree building online tool, to analyze your DNA matches and create a network graph. Network graphs consist of DNA matches, the nodes, and shared match connections, the lines between the nodes. In RootsFinder, you import your matches and then link them to the common ancestor in your tree. Then they are automatically colored. Viewing the matches in triangulation/cluster view allows you to see groups of matches that share DNA with each other. Join us as we discuss how to do this!
Transcript
Nicole (1s):
This is Research Like a Pro episode 180: Rootsfinder Network Graphs. Welcome to Research Like a Pro a Genealogy Podcast about taking your research to the next level, hosted by Nicole Dyer and Diana Elder accredited genealogy professional. Diana and Nicole are the mother-daughter team at FamilyLocket.com and the creators of the Amazon bestselling book, The Research Like a Pro a Genealogists Guide. I’m Nicole co-host of the podcast join Diana and me as we discuss how to stay organized, make progress in our research and solve difficult cases.
Nicole (39s):
Let’s go, hi everyone. Welcome to Research Like a Pro.
Diana (47s):
Hi, Nicole, how are you doing today?
Nicole (49s):
I’m great. I’m excited for the holidays and just excited to enjoy this time with family. And how about you? What have you been doing
Diana (59s):
Well? I am happily working away on different things. I did a couple of webinars lately that were really fun. I revisited our Research Like a Pro in 30 minutes a day. And I did that for a group of alumni from several different universities. That was really, really fun to remember how much progress you can make. And just setting aside 30 minutes a day to do some research when you have a process. And then the other webinar was on mind mapping. And that was also really fun. That was for the Broward county, Florida genealogy society, but they were so kind that they opened it up to the public.
Diana (1m 40s):
So there were about 200 people that attended, and we had people from Australia and all over the country, but it was great.
Nicole (1m 48s):
I have loved using mind mapping in the past. It’s really fun. And now that we use lucid chart for diagramming, it’s just all coming together. I love having those visual options to be able to map out my thoughts and also to map out family relationships and connections.
Diana (2m 7s):
It is. And I showed lots of examples using both lucid chart diagrams, and then also using the mind map, mind mapping program that we have used. Well, let’s do our announcements for 2022. We have two study groups. We have our spring DNA study group, which begins February 16th and registration is now open our fall regular Research Like a Pro study group will begin in September. If you’re interested in being a peer group leader for the DNA study group, the application is on our website. We’d love working with our peer group leaders and hope that anyone interested. We’ll go take a look at the application and consider joining us, and then as always join our newsletter for coupons and special deals on our courses.
Nicole (2m 54s):
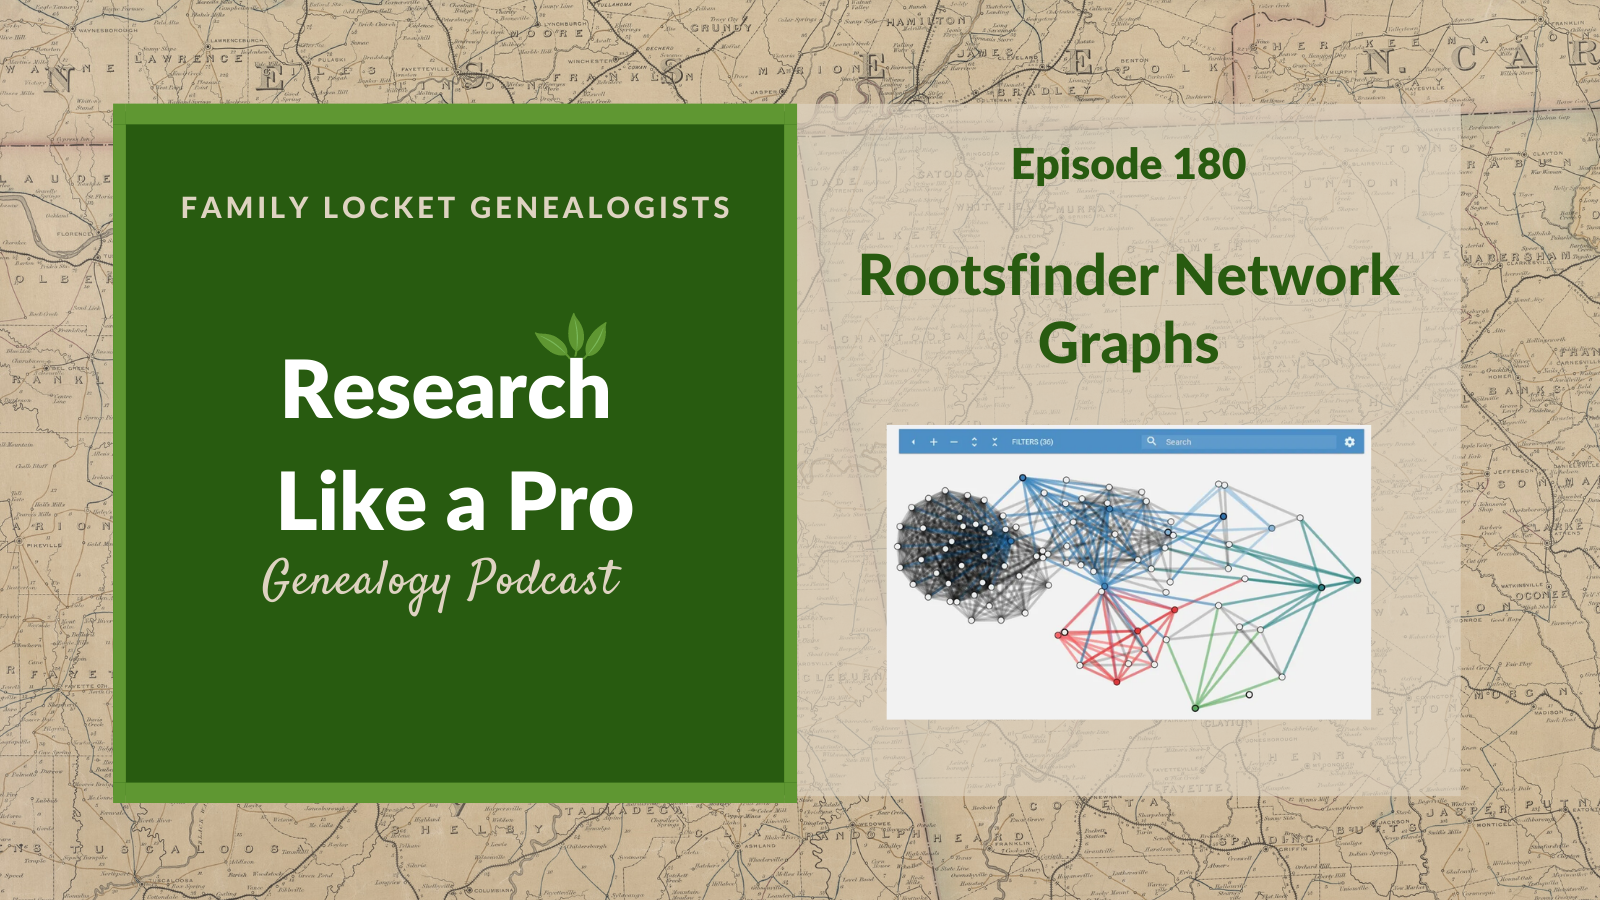
Great. Well today we’re talking about network graphs, which is one of my favorite topics as far as analysis of DNA matches and cluster groups. And the topic specifically within network graphs is how to make them using the RootsFinder website. RootsFinder is a family tree building website owned by Find My Past. And it also has a DNA analysis component within it. So after you add your tree, you can also do some DNA analysis after importing some information about your matches. So it’s kind of a mix between building your family tree and DNA analysis. So RootsFinder has a DNA feature called the triangulation or cluster view, which allows you to view your matches in clusters.
Nicole (3m 40s):
And this is also known as a network graph and in a network graph, the nodes are DNA matches. So all the little dots on the network graph or nodes, those are DNA matches. And then the lines connecting the DNA matches indicate that they are shared matches with each other and with you. So we’re going to talk today about how to view your Ancestry DNA matches and shared matches as clusters within RootsFinder and their triangulation view, viewing your matches and clusters is really helpful because it can help you find relevant matches that are probably related on one family line. And so if you’re interested in looking into a specific brick wall in your family that will help you to locate matches who are probably on that family line in the past, I’ve used several different ways to visualize my DNA matches in network graphs.
Nicole (4m 33s):
There’s a few different options. I’ve talked before about ordering a network graph from Connected DNA, Shelly Crawford and her business is not currently making network graphs right now, but she taught me how to make them with Gephi, a program that is mostly used by people who are doing social media networking. It’s open source, but it allows you to make network graphs with your downloaded match list and shared match list if you download those. And so I’ve used that quite a bit and really like it, but it is kind of difficult to learn. That’s why I like RootsFinder because it’s not as difficult. It does have some steps you have to follow, and you do have to set a few things up.
Nicole (5m 15s):
Like you have to set up your tree first, but once you get into it, the program, it’s a little simpler than using Gephi to make a network graph. So I do recommend it if you would like to try a network graph, but you don’t want to try learning how to use the difficult program called Gephi. So we’re going to kind of walk you through some of the basic steps, and there are some tutorials at the RootsFinder website that help you with each step along the way. And we have a blog post that goes along with this podcast episode, so that you can give this a try.
Diana (5m 45s):
Thank you so much for that explanation of RootsFinder. I think everyone who’s been listening to the last several podcasts has heard me talk a lot about how much the Gephi network graph that you made for me, me to identify that cluster for my Cynthia Dillard problem of this possible brother, Elijah Dillard. It was just hiding out there in all those matches. And so it was really the visual network graph that helped me see that. So this is so exciting that RootsFinder has a way to do that a little bit easier for anyone who doesn’t want to tackle Gephi. And so I’m really excited to talk through this and I would highly recommend everyone to go look at the blog post so you can see images of what it really looks like.
Diana (6m 30s):
So cool. So how do you get started with this? Well, first of all, you have to set up a tree. We use GEDCom file types. Anytime we’re trying to take a family tree from one site to another, and the com file type was set up years and years ago when we were first going into the digital age and wanting to share trees back and forth, I can remember sending GEDComs to my cousins through the new email systems that we had in the early 2000s or late 1990s. And it was so fun to get their GEDComs and open it up and see all their family trees. Now, we pretty much just share our Ancestry trees that GEDComs are still useful.
Diana (7m 11s):
So you can create a dotcom by exporting your Ancestry tree. If you’ve already got that built there, you can just export it. Or if you have your family tree in something like Roots Magic, or Family Tree Maker, any of those genealogy databases will let you export a GEDCom of your family tree. And then you import that to RootsFinder to create a tree there. And it’s probably best to just bring over seven to eight generations because that’s, you know, what will be useful for using DNA. So if you have your tree built out all the way back to the 1400s, you know, that you probably won’t want to bring in all those ancestors, because you will not have inherited DNA from all of them.
Diana (7m 54s):
So just seven to eight generations or even less, you know, it’s possible, you don’t have that many ancestors in your tree. So just see what you have. Now. There is a great tutorial on RootsFinder called how to start a tree with a GEDCom and it will walk you through using screenshots exactly what to do. So I always highly recommend having two screens, but your screen, if you only have one monitor or use two monitors and have the tutorial open on one and do your own programs open on the other. So you can do this a little bit more easily. You can import from FamilySearch, but if you do that, make sure that you don’t import all the media and photos.
Diana (8m 37s):
You get a free plan, if your tree is not too big, but if you have over one gigabyte of media storage, it can’t be on that free plan. So if you’re bringing over your tree from FamilySearch, just bring the people. The paid plan is $35 a year, or if you just want to pay per month, it’s $5 per month. In the DNA and the genealogy world, we have a lot of things that cost. And sometimes I like to just do a monthly subscription to try something out. And then if I want to do something again, down the road, I can pay another $5. And then sometimes if it’s a site that I use a lot, it’s just a better deal to go ahead and pay for the whole year plan.
Diana (9m 18s):
If you do have the paid plan, then you can have up to 10 gigabytes of media storage. And as in all of our online trees, living people are always kept private. So if you have added a lot of living people in your database, like say Roots Magic, and then you create the GEDCom when you upload it to RootsFinder, those people will still be private. So you don’t have to worry about that
Nicole (9m 40s):
While you were talking. I kind of realized that the point of doing this is to use the DNA tools. So you probably will just want to pay for the premium plan. If you have a too big of a tree, then you’ll have to pay for a premium but you’re going to have to pay for it anyway. So you may not need to care about that when you’re importing your tree from FamilySearch. But you can use one of the DNA features without the premium plan. They have the DNA list view. And so if you want to just get started with the free plan and work on that and start labeling DNA matches to which ancestor they came from RootsFinder allows you to add color coding to the matches based on your tree.
Nicole (10m 22s):
And so it can be connected like that. So you could just work on that with the free plan, but in order to use their segments and triangulation, they use that for the network graph view and the matches circle view. If you want to exalt those, then you need the premium plan. Yeah. I also just try it out for $5 a month, every time I’m thinking about it. So it’s definitely a good way to, to try out these tools.
Diana (10m 47s):
I agree. Well, that’s good to know. It’s always kind of tricky, figuring out all the pricing and different levels and what you need to do. So thanks for clarifying that.
Nicole (10m 57s):
Yeah. So after you import your GEDCom into RootsFinder, whether you do seven or eight generations, or even up to like, you know, 11 or 12, I was thinking might be useful sometimes, but you don’t need to import all of their descendants, like the full tree. You could just do like your ancestors and then their children. It’s up to you, whatever you should have enough space for all the people. If you don’t add all the images anyway. So after you get all that done, then you can set up the DNA profiles. There is a RootsFinder article called getting started, create your DNA profile. And so I’m just going to read a little bit from that so that you understand what they mean when they’re talking about setting up your DNA profile.
Nicole (11m 41s):
So it says the first step in using RootsFinder DNA tools is to create your DNA profile and specify which DNA source you will be using RootsFinder doesn’t process, raw DNA data. We use spreadsheets created from your DNA data. You will need to import your raw data to GEDMatch or use DNA jet com, which read the reports created by your DNA source to create your spreadsheets. After you’ve created a profile, you add those spreadsheets into risk finder. So since we’re talking today about using Ancestry matches, instead of using Ancestry, you could import that test from Ancestry into GEDMatch and then use that data.
Nicole (12m 24s):
So you could use segment, but since their database is pretty small, I decided, you know, GEDMatch the database is pretty small. I decided to download the matches with dna.com and dna.com create spreadsheets for you. And then I imported those into RootsFinder. So let’s talk a little bit more about how to use DNA GEDCom because we usually get a lot of questions about this and our DNA study group. It’s not super easy to use. There’s just a few little quirks about it. So we’re going to explain that.
Diana (12m 60s):
Yeah, I remember when I first try to use it, it was for an advanced DNA Institute course. And I think all of us were trying to download at the same time in the same room. And we had a lot of problems, but at home with my regular internet, I could do it. So DNA GEDCom allows you to download your Ancestry DNA matches, and you do have to have a subscription to it. And after you subscribe, you can use the DNA GEDCom client and DNA GEDCom client will let you create two CSV files. So those are files that you use in like Excel, a spreadsheet, and one is called the M file, And that is short for match.
Diana (13m 45s):
So that is a file of all of your DNA matches. And then you have an in common with file, which is how everybody connects to each other, who in common with who? So you import both of those, the match and the in common with files to RootsFinder, and then to add them to your account, they have tutorials. They have screenshots to tell you exactly how to get everything added. Just note that some of the screenshots are a little outdated. It’s really difficult when companies change and screenshots change all the time to keep blog posts and things updated.
Diana (14m 26s):
So if you see a different look than what you see in a tutorial, just know that it’s very similar. It’s probably not wise to download all of your matches because you don’t want to have more than can actually be used. So maybe a good amount would be something from 40 centimorgans to 200 centimorgans.
Diana (16m 11s):
If you download all your Ancestry matches, it does take a long time. Often two to three days. We’ve had people that have lots of, lots of matches and lots and lots of in common with take even longer than that. So sometimes you have to experiment a little bit with a good number.
Nicole (15m 5s):
Yeah. So the first time I used DNA GEDCom I didn’t realize that the output was going to be a spreadsheet. And I didn’t know where to find that on my computer. So it’s a little bit of a learning curve, but just know that when you go into the DNA GEDCom client and tell it to gather your matches from Ancestry, it’s putting all those matches into its database. And then when it’s done, then DNA GEDCom client generates the reports, which are in the form of CSV spreadsheet files. And so then you need to go find those on your computer. The start page of DNA GEDCom. Client tells you the file location, where it’s going to save those spreadsheets. So you can even go to that page and click open that file directory, and then it will show you where those reports have been generated.
Nicole (15m 50s):
If you have any problems while you’re using DNA GEDCom, I really recommend that you use the Facebook group because there’s others using the same program there, and they can probably help you. You can also email the creator of DNA GEDCom client If there’s a problem. When I did this, I downloaded my matches from 400 to 200 centimorgans at Ancestry. And one caveat is that if you have endogamy in your family, you probably won’t be able to download all of your matches and in common with, because there are so many shared matches. And so many matches. Recently in the study group, we had a person trying to download their matches and it wouldn’t work for them.
Nicole (16m 32s):
So I tried to help, and it just never completed because there were so many, it was constantly going and going and gathering more and more. So there were millions of shared match connections. A spreadsheet in Excel can only open a million. And if there’s over a million connections, then you have to divide it into multiple spreadsheets. So it just, it just doesn’t work as well. And if you’ve been learning about endogamy, you’ll know that clustering matches and grouping them into networks is much more difficult than with people who don’t have in talking to me in their family tree.
Diana (17m 5s):
And even with, if you don’t have full on endogamy have pedigree collapse where you have common ancestors and we have this a lot in the south, you might have run into that situation where you just had so many people matching with each other and so many matches. So every case is different. And you may have to experiment a little bit with how you want to gather your matches.
Nicole (17m 26s):
Yes. You know, we actually ended up making a network graph for that DNA kit who had endogamy their family by changing the parameters to be 90 centimorgan’s to 100. So it was really small. And what we got were I think, three clusters and the two main clusters were very overlapping. So it was interesting. Yeah,
Diana (17m 53s):
It is. There’s a lot of ways to work with DNA. And the more we learn, the more we learn there is additional things we can do. Sometimes we think, oh, I can’t do anything. But then we find a new tool that really helps us. And that’s what I love about this RootsFinder and the network graph, because it does open up your DNA to looking at it differently and helping you find something new or helping you to organize it.
Nicole (18m 17s):
It does. It really helps you organize it. Going back to what you were saying about choosing a subset of your matches to download, you know, maybe 400 to 200 centimorgans, another of the reasons why that’s a good idea when you’re doing routes finder, triangulation cluster view is that it cannot load more than twenty-five thousand shared match connections. So if you bring in all of your Ancestry matches and all of the, in common with shared match connections among them, you will have more than 25,000 shared match connections. So you’re going to have to choose a smaller amount to analyze. If you try to bring them all in, you may get this message.
Nicole (18m 57s):
There are over 25,000 links between matches, which is too many to show, please click on filters to add a filter. So if you get this message, when you’re in the triangulation cluster view, click filters, and then change the centimorgans range so that there are less matches selected. So you can download a subset of your matches, but if they’re still over 25,000, then you can filter even another subset of your matches in RootsFinder. And that’s what I had to do because it had so many,
Diana (19m 30s):
That’s so nice. So you don’t have to gather again, you can just filter out some of them right there within the program. Yes.
Nicole (19m 36s):
And that is actually really nice because it gives you the flexibility to view your network graph in different ranges. You can instantly change from viewing 40 to 200 centimorgan, total shared DNA to just viewing those between 90 and 120 shared centimorgans of DNA. And just looking at a very small network graph. It just has, you know, a few hundred matches instead of a thousand matches.
Diana (20m 4s):
So nice one, these tools will easily let you look at things in a different,
Nicole (20m 8s):
Yeah, it is really nice in contrast on my heritage with their auto cluster report, they choose the parameters for you and you don’t get to adjust them, which can be nice because a lot of people who are using that don’t know what parameters would be good. So it does make it a little bit more user-friendly. But then again, for analysis purposes, that inability to change the parameters means that you’re just kind of stuck with whatever you get. And that can be frustrating sometimes. Good point when I downloaded my Ancestry DNA matches to that CSB spreadsheet file withDNA GEDCom client, the spreadsheets included the notes that I had made on about who the common ancestors were with some of the matches.
Nicole (20m 52s):
So this was wonderful because those notes imported into RootsFinder. When I imported the match list that dna.com created it also imported links to the match page at Ancestrywith that person, and also a link to the matches tree at Ancestry. So it was a really convenient looking at the matches to see I had already left notes on this person. I could figure out who the common ancestor was. So in RootsFinder, you are able to color-code the matches. And this is kind of similar to what you do in Ancestry with using the colored dots system in Ancestry. And when you’re looking at your matches there, you can add a color dot to somebody to indicate that they are descendants of a certain ancestor.
Nicole (21m 34s):
And then that helps you make these clusters and RootsFinder. It’s very similar. You just figure out how you’re related to that match and who the common ancestor is. And then you just tell RootsFinder. This DNA match is a descendant of somebody in your RootsFinder tree. And so that’s why you need to have your GEDCom imported into RootsFinderbecause it, it helps you group your matches. So when you tell RootsFinder that a certain match is descended from a certain ancestor, RootsFinder gives a color to that match based on their pedigree color scheme. There’s a help article at RootsFinder about this color coding.
Nicole (22m 16s):
And it says by default, the paternal paternal line is blue. The maternal paternal line is green. The maternal paternal line is red and the maternal maternal line is yellow. So it has those color coding choices already pre-chosen. And then after you have color coded your matches, when you go in and look at your triangulation cluster network graph view, it will automatically be colored based on people you’ve already identified who have common ancestors with you.
Diana (22m 47s):
Well, that is so neat. And as you were talking, I was thinking of that about the importance of really working with your match lists and trying to identify your matches, because obviously if you have worked with those and you’ve got notes in your Ancestry DNA matches, and you know how these people go back to a common ancestor, well, then that makes this program so much more powerful, how exciting.
Nicole (23m 16s):
Absolutely. And at first I was like, oh, I have to do all this extra work. I have to, you know, find out how they’re related and put it into RootsFinder in order to make this network graph have colors. But then because I already had the notes, it was actually really easy. And I just spent an hour scrolling through the match list view in RootsFinder and noticing which ones had the comment icon, which means I had had a note, I went to that match and quickly linked them to the ancestor and the tree. And it, it was kind of fun.
Diana (23m 45s):
That sounds something you could just kind of want to play with
Nicole (23m 48s):
For a long time. Yeah, it was great. It kind of reminds me of going through my Ancestry DNA match list and you can filter for people who have a common ancestor, hint, and then just quickly going through those hints to add the colored dots to your Ancestry match list.
Nicole (25m 57s):
So it’s very similar method,
Diana (24m 9s):
Right. But the nice thing is that you get to see a visual of these clusters of all the people that match. And so, you know, what happens if you don’t know a match? Do they just group all the unknowns or how does that work?
Nicole (24m 22s):
That’s a good question. So after you have color coded in your matches, then some of those matches will be colored in the network graph or triangulation cluster view. And I wasn’t able to identify all the matches in my matchless, obviously. So the ones that I didn’t identify a common ancestor for will remain white with black lines in that network graph, triangulation view, but some of them have colors. So if you have two or three people in one of your clusters that are blue, then you can probably guess that all of those people are going to be from the paternal paternal line because that is the blue cluster.
Nicole (25m 4s):
So let’s talk about how to get to the network graph view just to really quickly, when you’re in RootsFinder on the sidebar, you’d go to the DNA analysis view. And from there, you’ll see a list of your matches, but then at the top, you’ll see an arrow down where you can click the option for the triangulation cluster view. When you do that, it will tell you if you have too many shared match connections, you might need to select a filter so that the triangulation cluster view is able to load. In my example, on the blog post, I chose to view matches from 70 to 120 centimorgans, so the triangulation view shows those shared match connections when using matches from AncestryDNA.
Nicole (25m 45s):
But as a side note, when you’re using like MyHeritage or FamilyTreeDNA and the matches and in common with, from there, it also can include segment data. So because we’re using Ancestry, it’s a little bit different, but just note that you can also use segment data and the triangulation cluster network graph view at rates finder, and I’m going to do a blog post about that coming up soon. Anyways. So the first thing that you’ll see when you go to the triangulation cluster view is a blob of interconnected matches. You know, some are colored, some are black to get them to kind of separate out into more distinct cluster clusters. You can click on the outward facing arrows at the top next to the plus and minus side.
Nicole (26m 30s):
So the plus and minus sign allow you to zoom in or out. And then the outward-facing arrows allow you to expand the network graph to clearly separate out some clusters. When I did this, I noticed that the lines yellow and red shared several double cousins. So because of that, you’ll see that the red and yellow clusters on my example picture are interconnected, but the paternal line separated out nicely into green and blue clusters. And even though I didn’t know all the matches and their common ancestors, I can now look at this and infer that the unknown matches in the blue cluster are from the paternal paternal line.
Nicole (27m 11s):
In my example, I selected someone in the blue cluster named Linda, and then I chose to view only matches that were connected to her. And so that’s another great feature of RootsFinder network graphs is that you can focus in on really specific parameters. And then I chose a larger range of centimorgans to view for matches, who are in common with Linda from 40 to 200 centimorgans. And then I also chose to include matches up to two degrees of separation from Linda. So that means Linda’s shared matches and the shared matches of Linda’s shared matches. So they weren’t shared matches with Linda, but they were shared matches with her shared matches, if that makes any sense at all.
Nicole (27m 53s):
So that’s what the two degrees of separation filter allows you to do. And this resulted in a hundred matches connected to Linda and her shared matches. And many of them probably related on that paternal paternal side. So it kind of helps you narrow down a certain side of the family and then bring in some more matches that are probably related on that side.
Diana (28m 12s):
Wow, that is so neat. And it’s so fun looking at the visual. I can just see how this would just really open up some ideas for a researcher, trying to figure out how some people are related to you or finding some new avenues to explore. So, wow, thanks for writing this blog post and putting in the images. So just kind of to wrap this up, I wanted to mention one more thing that you wrote about in the blog posts, and that is if you want to use your Ancestry matches from GEDMatch. So if you have uploaded to GEDMatch, you can also use this feature with RootsFinder and you would use the triangulation data from the tier one GEDMatch, which is a paid feature, and you can just pay for that by month.
Diana (28m 55s):
So that’s always a good thing to do, and they have a tutorial triangulation set up that update and navigation, and it shows you clusters of individuals who share segments. So instead of in common with their shared matches, you get to see people who share segments. So it’s another way to look at your DNA. And if you’re trying to triangulate and find those shared segments, this is a great way to do it.
Nicole (29m 22s):
Yeah, it is. I think it’s really neat to look at those shared segments instead of in Commonwealth. And I’m kind of working on generating a network graph at RootsFinder using shared segments from my heritage. So I’ll be coming out with a blog post soon about that. I’m excited. It’s always fun to experiment with these tools and we really enjoy talking about them and sharing them with you. Let us know if you have questions about certain DNA tools or features. We’d love to talk about them on the podcast
Diana (29m 48s):
For sure. And go check out the blog post and leave us a comment. If you’ve tried it. If you found something amazing using RootsFinder to create your own network graph.
Nicole (30m 0s):
All right, thanks everyone for listening. We hope you have a great day and good luck trying a network graph
Diana (30m 5s):
That. Bye everyone. Bye.
Nicole (30m 8s):
Thank you for listening. We hope that something you heard today will help you make progress in your research. If you want to learn more, purchase our book Research Like a Pro a Genealogist Guide on Amazon.com and other booksellers. You can also register for our Research Like a Pro online course or join our next Study Group. Learn more at FamilyLocket.com to share your progress and ask questions. Join our private Facebook group by sending us your book receipt or joining our e-course or Study Group. If you like what you heard and would like to support this podcast, please subscribe, rate, and review. We hope you’ll start now to Research Like a Pro.
Links
RootsFinder Network Graphs – https://familylocket.com/rootsfinder-network-graphs/
DNAGedcom – https://dnagedcom.com/
Rootsfinder – https://www.rootsfinder.com/home
Research Like a Pro Resources
Research Like a Pro: A Genealogist’s Guide book by Diana Elder with Nicole Dyer on Amazon.com – https://amzn.to/2x0ku3d
Research Like a Pro eCourse – independent study course – https://familylocket.com/product/research-like-a-pro-e-course/
RLP Study Group – upcoming group and email notification list – https://familylocket.com/services/research-like-a-pro-study-group/
Research Like a Pro with DNA Resources
Research Like a Pro with DNA: A Genealogist’s Guide to Finding and Confirming Ancestors with DNA Evidence book by Diana Elder, Nicole Dyer, and Robin Wirthlin – https://amzn.to/3gn0hKx
Research Like a Pro with DNA eCourse – independent study course – https://familylocket.com/product/research-like-a-pro-with-dna-ecourse/
RLP with DNA Study Group – upcoming group and email notification list – https://familylocket.com/services/research-like-a-pro-with-dna-study-group/
Thank you
Thanks for listening! We hope that you will share your thoughts about our podcast and help us out by doing the following:
Share an honest review on iTunes or Stitcher. You can easily write a review with Stitcher, without creating an account. Just scroll to the bottom of the page and click “write a review.” You simply provide a nickname and an email address that will not be published. We value your feedback and your ratings really help this podcast reach others. If you leave a review, we will read it on the podcast and answer any questions that you bring up in your review. Thank you!
Leave a comment in the comment or question in the comment section below.
Share the episode on Twitter, Facebook, or Pinterest.
Subscribe on iTunes, Stitcher, Google Play, or your favorite podcast app.
Sign up for our newsletter to receive notifications of new episodes – https://familylocket.com/sign-up/
Check out this list of genealogy podcasts from Feedspot: Top 20 Genealogy Podcasts – https://blog.feedspot.com/genealogy_podcasts/


1 Comment
Leave your reply.