Have you ever wished you could cross reference your genealogical findings? Find all the census records in a certain county for a family? Look at all of the mentions of a surname in a city? With Evernote, you can do all of this and more. In a previous post I wrote about using Evernote to create a genealogical research center. Today I’ll share my method of using Evernote to organize my research findings.
Genealogy Notebooks
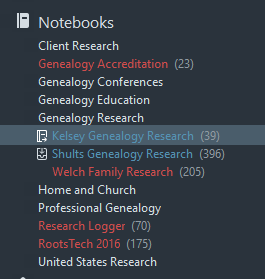 The first thing you’ll need to do is decide what notebooks to create. I wrote about the basic organization of Evernote previously, so if you need help understanding notebooks and notes refer to my post, Create Your Own Genealogy Reference Center With Evernote. The screenshot illustrates my basic notebook stacks with only my Genealogy Research notebook open showing the three notebooks it contains: Kelsey Genealogy Research (maternal line), Shults Genealogy Research (paternal line), and Welch Family Research (Nicole’s shared research notebook).
When I first started using Evernote, I researched various ways others were organizing notebooks for genealogy and and created just two notebooks – one for my maternal line (Kelsey) and one for my paternal line (Shults). Those lines are in completely different parts of the world and don’t intersect until me, so the records I put in each notebook don’t have any overlap. Nicole is actively research our Welch family line and is adding information as she finds it. Currently that note book has 396 notes!
I didn’t want to create too many notebooks – one for each surname for example. I use Evernote for many things and like to keep my notebooks manageable. I nested my genealogy research notebooks under the main notebook titled “Genealogy Research.” The screenshot shows those two notebooks in blue because I have shared them with Nicole. The “Welch Family Research” notebook is one that Nicole has shared with me so it is red.
Genealogy Notes
What kind of notes do I include in my Genealogy Research notebooks? Genealogical records such as marriage certificates, links to websites, typed notes on an individual, web clippings of book pages and newspaper articles, land plot maps, emails, DNA notes, county history information – anything and everything that pertains to my family.
Notes within a notebook can be created many ways. Typing, uploading a PDF or document, or clipping from the web are the three I use the most. To make the best use of Evernote, choose a naming protocol for the title then follow it with each note you create. Notes can be sorted in three ways: the date a note was created, the date a note was updated, or the note’s title. If each note begins with a surname, all notes with that surname will line up. If each note begins with a date, the notes will be sorted from earliest to latest.
I use the following naming protocol – the same one that I use for renaming a record file when I download or scan a document: DATE-RECORD TYPE-NAME-PLACE. I have downloaded the desktop version of Evernote, so when I right click on a photo or document I can send it directly to whatever Notebook I have open on Evernote. This automatically creates a new note in that notebook and the file name becomes the note title. All I have to do then is quickly add the tags.
The steps to adding a document or photo from your hard drive directly to a notebook in your desktop version of Evernote:
- Open the correct Notebook in Evernote
- Open your files on your hard drive
- Right click on the photo or document
- Select “Send to” then “Evernote”
- View the photo or document on Evernote and add tags
Tagging Notes
The true power of Evernote comes with the tagging capability. I tag each genealogy note with the location(city/county, and state/country), surname(s), and record type. Because the date is in the title, I don’t need to add that as a tag. When I want to search for all of the Royston’s in Indian Territory, I simply select those tags and a list of notes appears. How about a search for all of the censuses for my Shults family in Texas – yes I can do that too. Evernote makes this simple. You really are only limited by your imagination when it comes to tagging. Be consistent with whatever method you choose.
The screenshot below shows a note I created by sending the document from my hard drive to Evernote. I added tags for both the county and state, the type of record, and two surnames. I can tag a document with as many surnames as I like and because this notebook contains all notes on my paternal side it works well.
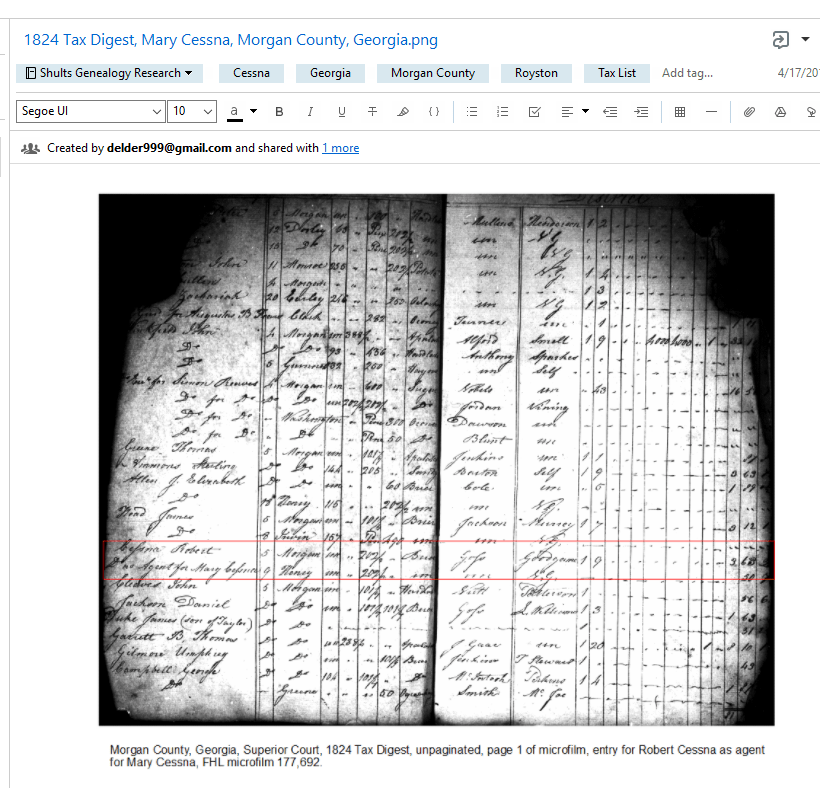
How does adding my documents to Evernote help my genealogical research? Solving a challenging problem is all about making connections. In the example above, the tax digests of Morgan County, Georgia, are key evidence in connecting Thomas Beverly Royston to his mother, Mary Cessna, based on location. Being able to tag the note with both surnames and locality helps me remember the connection. I could also add a detailed note under the document. In this example I have the source citation attached to the document, if I didn’t, I could copy and paste the source citation from my research log under the image.
Using the Web Clipper to Research
How many times have you run across a record that isn’t part of your research plan and you want to explore it, but you don’t want to forget about it. Using the web clipper, you can quickly clip the record, save it to the appropriate notebook in Evernote, quickly tag it and even add a tag like “to do” or “check out.” You can stay on task and still save that record somewhere you can relocate it.
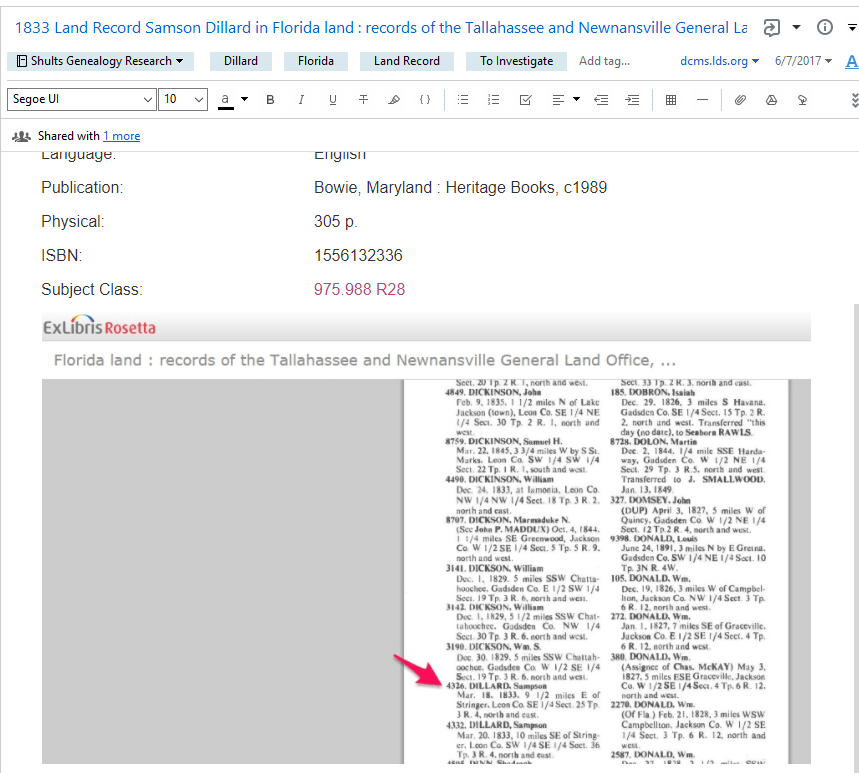
In the example below, I was searching a digitized book online and came across a record for a Sampson Dillard. I wasn’t actively researching him at the time, but wanted to save this reference for the future. Using the Evernote Web Clipper, I took a screenshot of the page, annotated it with a large red arrow, and added the appropriate tags including “To Investigate.” I copied and pasted the FamilySearch Catalog information to the note so I’d have the reference. Evernote saves the URL, but since those can change, I like to make sure I have the source identified.
Create a Summary of Known Facts
I like to create a summary of known facts about the individuals I research. I create a simple table in Evernote and add to the information as I research. I worked on sorting out my Weatherford family three years ago and haven’t looked at them for at least two years. I created detailed summaries on each member of the family and reviewing them, I see at a glance what is known about the family, how I know it, and my thoughts about future research.
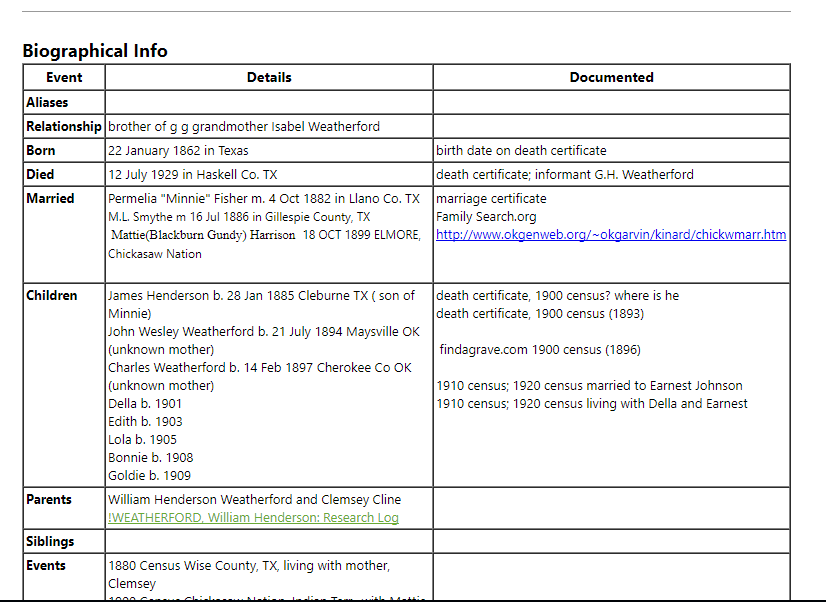
If you keep research logs, or research reports in a Google Doc, you can add a link to it within your summary. You can also link to online documents or other notes within Evernote. In the example above, I linked to another note in Evernote titled “!WEATHERFORD, William Henderson: Research Log.” Because it is a link to an internal note, it shows up as green. Regular links will be blue. To link to an internal note, simply go the note to be linked, right click on the small view of the note in the center section, and select “Copy internal link.” Then go to the the summary or other note and paste in the link. It will appear in green.
The more you use Evernote, the more comfortable you’ll get with the various features. Because Evernote is a third party tool, don’t rely on it solely to keep your genealogical information safe. I keep my documents on Google Drive which also saves a copy to my hard drive. I have a desktop genealogy program that is backed up to the cloud, and I use Evernote as a productive way to further my research. The tagging and search capabilities truly make it a valuable tool for the Genealogist’s toolkit.
Best of luck in your genealogical research!


4 Comments
Leave your reply.