Using a family tree program to organize your DNA matches is useful for several reasons. You can:
– add DNA matches to your tree and link them back to your common ancestor
– include DNA matches from various testing databases in one central location
– check the evidence for each parent-child relationship and add documentation
– build quick trees for DNA matches who haven’t shared a full tree
– do descendancy research to find potential test takers
– build out a match’s tree checking for more than one common ancestor
Many of your DNA matches may have small trees that don’t go back far enough to find a common ancestor. Genetic genealogists often use tree building tools like Ancestry.com to create quick trees for DNA matches. Ancestry has helpful tree building tools like hints that assist with building quick trees. However, creating a new tree for each DNA match fills up your list of Ancestry trees quickly. If you don’t want to have a long list of Ancestry trees, create one master genetic tree and include all the DNA matches of a test taker or on a particular side of the family.
Privacy Settings for Ancestry Trees
Before you add your genetic matches to your Ancestry tree, consider the privacy settings. There are three levels of privacy for Ancestry trees: public, private and searchable, or private and unsearchable.
Public trees are viewable by those you invite to collaborate and anyone with an Ancestry subscription. People in your tree who are marked living are automatically privatized for those who are not invited to collaborate on your tree.
Private and searchable trees are shown in search results of the Public Member Tree database, but to click through to view the tree, users must first ask for your permission. For Ancestry Thrulines to work, your tree must be set to either public or private/searchable.
Private and unsearchable trees do not appear in search results and are not used in Ancestry Thrulines. You may want to mark your research trees unsearchable so that others don’t copy unproven relationships into their trees. To do this, go to your tree settings > privacy settings. From there, select “Private Tree” and then check the box below that says “also prevent your tree from being found in searches.”
If you want to keep your private, unsearchable trees from being found by anyone, don’t save images that other Ancestry users have added to your tree. This includes ancestor profile images, images of headstones, and so forth. These images are often added when you build a quick tree for a DNA match and use the Ancestry Member Trees hints. Every time someone saves these photos to their tree, their username and tree name are added the list, “in other family trees,” in the sidebar of the photo’s information page in Ancestry. To delete photos added to your private tree, go to the “media gallery” and click on the photo to delete it from your tree. You may want to keep your tree at this high level of privacy if you are working on a sensitive case.
Adding DNA Matches to Your Tree
Add your DNA matches as descendants of the ancestors you have already identified in your tree by building the lineage down to the present day. Be sure to mark your DNA matches as living, as well as their parents unless you know them to be deceased. Anyone who is marked living will be kept private when others view your tree unless you have added the viewer as a collaborator.
I typically add DNA matches to my tree who I think will be useful in proving a certain case. I then attach sources to document each parent-child relationship back to the common ancestor. When it’s time to write a proof argument, I can cite this tree I have created or add the citations for each parent-child link directly to my proof argument.
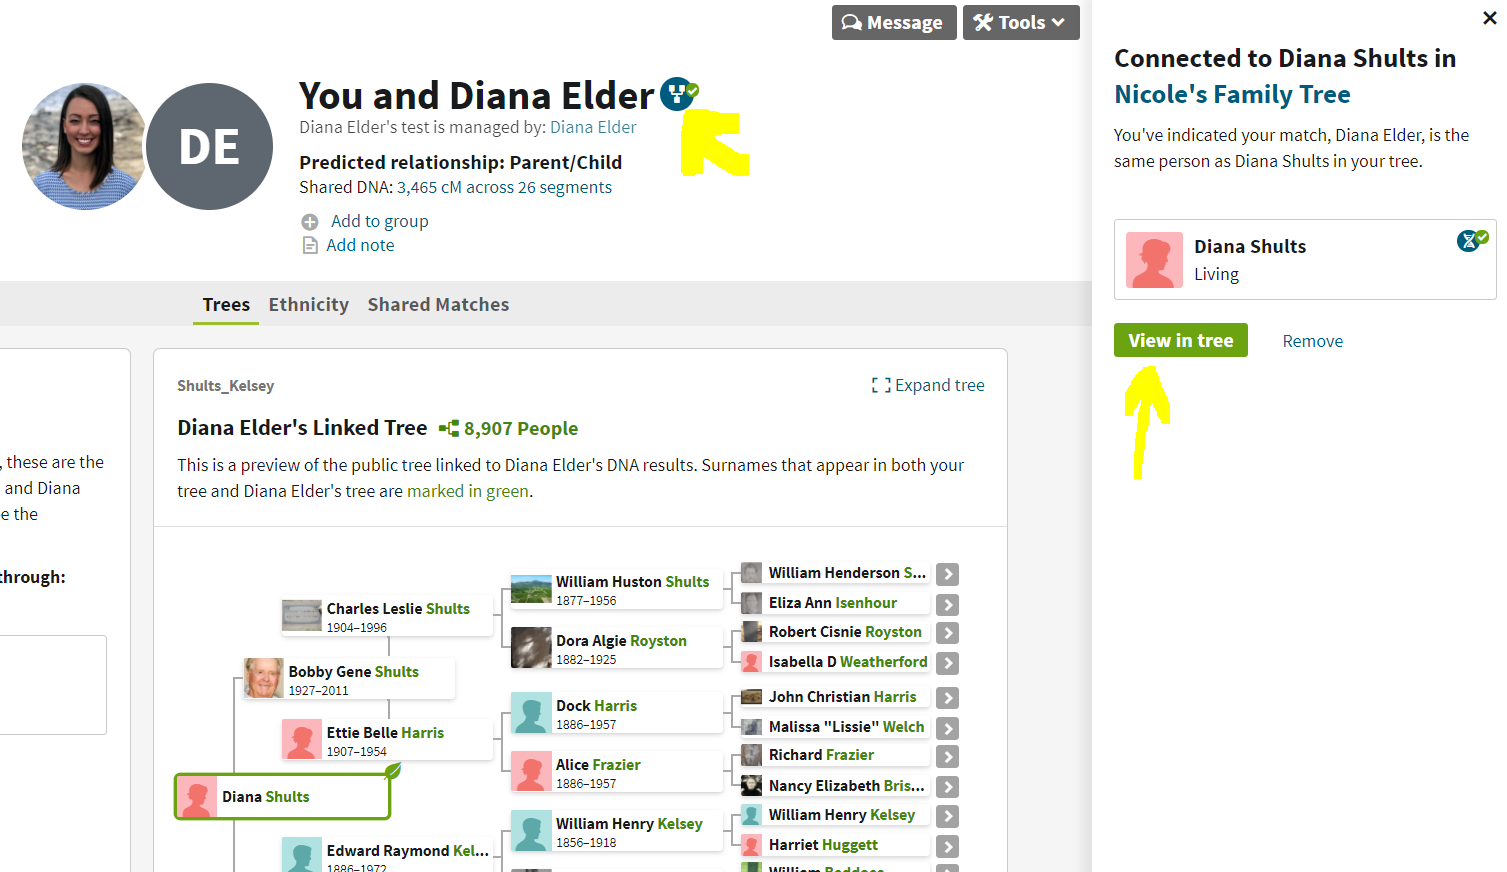
After adding a profile for the genetic cousin to your tree, you can link their DNA match page to that profile. To do this, go to the DNA match page for the genetic cousin and find the pedigree icon. Click the icon to find them in the tree and link them. After doing this, an icon shows on the genetic cousin in your tree indicating they are a DNA match. From the tree, you can click the icon to go to their match page. You can also click on the icon in your DNA match list to go to their profile in your tree, as shown below.
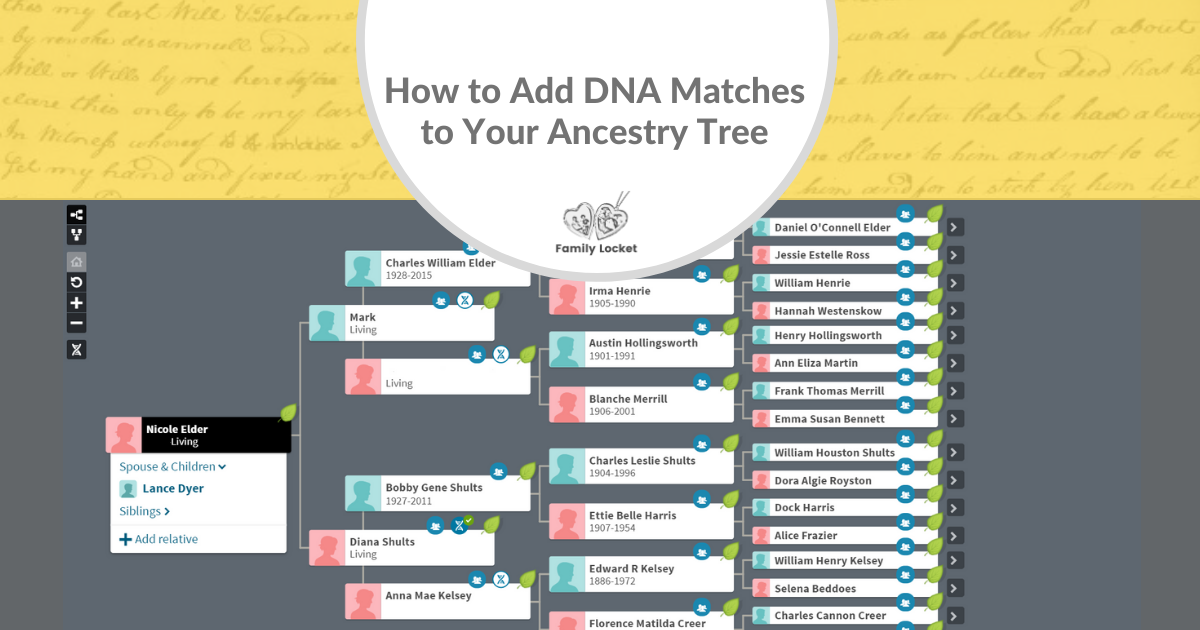
Adding matches to your Ancestry tree is a helpful way to visualize DNA matches in your family tree, especially when viewing it in family/descendancy view.
Adding People to Your Tree with Ancestry Thrulines
Ancestry Thrulines show how you may be connected to DNA matches through a common ancestor. If you have a public or private searchable tree connected to your DNA results, you will receive Thrulines. Thrulines are not proven conclusions about ancestors, but suggestions that may lead you to a conclusion. Ancestry uses the public and private searchable trees in their database to generate Thrulines suggestions for you and your DNA matches. Thrulines does not evaluate the amount of shared DNA between you and a match before suggesting a particular common ancestor.
Thrulines makes it easier to add DNA matches to your family tree. While you can’t add the matches themselves in Thrulines, you can their line of descent from the suggested common ancestor. The tree attached to your DNA results is the tree that will be updated when you add people from Thrulines.
If there is a dotted line around a person in Thrulines with the “evaluate” label, that means they are not in your tree. For example, you may find a sibling of your ancestor that you have not added to your tree yet as shown below. This new sibling of your ancestor has several descendants who are DNA matches to you.

To add this new sibling and the DNA matches to your tree, click on the sibling’s box to open the side panel and review the attached sources. If everything looks right, click next and add them to your tree. Continue adding the sibling’s descendants until you get to the DNA match. Then you will have to add the DNA match to your tree manually. After you add the parent of the DNA match, click the button in the side panel to view the parent’s profile. From their profile page, you can add the match to your tree by clicking “add child.” In Thrulines you can click on the box of people in your tree to be taken directly to their profile page.
If you are seeing a Thrulines suggestion with all the DNA Matches descending from just one child, it may not be accurate. Look for an ancestor who has descendants through multiple children who are DNA matches to you.
Adding a Disconnected Branch
Adding a DNA match as a disconnected branch in your tree allows you to build their tree until you discover the common ancestor. Once you find the connection, you can link up their floating branch to an ancestor who was already in the tree. Building trees for matches who share less than 15 cM may be futile because they could be false matches or may not share a common ancestor with you in a genealogical time frame.[1] Work on building trees of closer matches if possible.
To add a person to your family tree when you don’t know how they are related to anyone already in the tree, you must first add them as a spouse or child and then remove the relationship. After this is done, they will be a “floating” or disconnected branch in the tree. Once the relationship is determined, the person can be connected to known ancestors in the tree and reconnected.
A common reason to add a floating branch is when you are building a tree for a close DNA match (probably over about 40 cM) who you are sure is related in a genealogical time frame. The hope is that after extending their ancestral lines, you will find a common ancestor and be able to link them up to your existing tree. In this case, you will add the name of your DNA match as a floating branch to your tree and then work to build their tree. You may want to use the My Tree Tags feature to tag your matches so you can find these floating branches later. I like to add the link to their position in my tree to a research log so I can remember I worked on this match’s tree.
The simplest way to add a floating branch to your Ancestry tree is to add them as a spouse to an existing person and then remove the relationship. This is even easier than adding them as a child, because you only have one person to unlink the relationship with. Go to the profile any person in your tree and click the “+add” button on the right side next to “Family,” then click “spouse.” In the pop-up box that appears, type the name of the genetic match or person you are adding as a floating branch. Choose the gender of the person – if you are adding a spouse to a male, the gender will automatically be selected as female, but you can change it.
If you are adding a living person, like a genetic match, be sure to select “living” so they will be kept private to people who view your tree. Click save. Scroll down to see the person you have added in the list of spouses. Click on the person to go to their profile page. At the top of the page, click the pencil icon that says “edit.” In the menu that appears, click “edit relationships.” In the pop-up box for editing relationships, you will see the name of their “spouse.” Click the X to the right of their name to remove this relationship, and click “remove” when the system asks if you are sure that you want to remove this relationship.
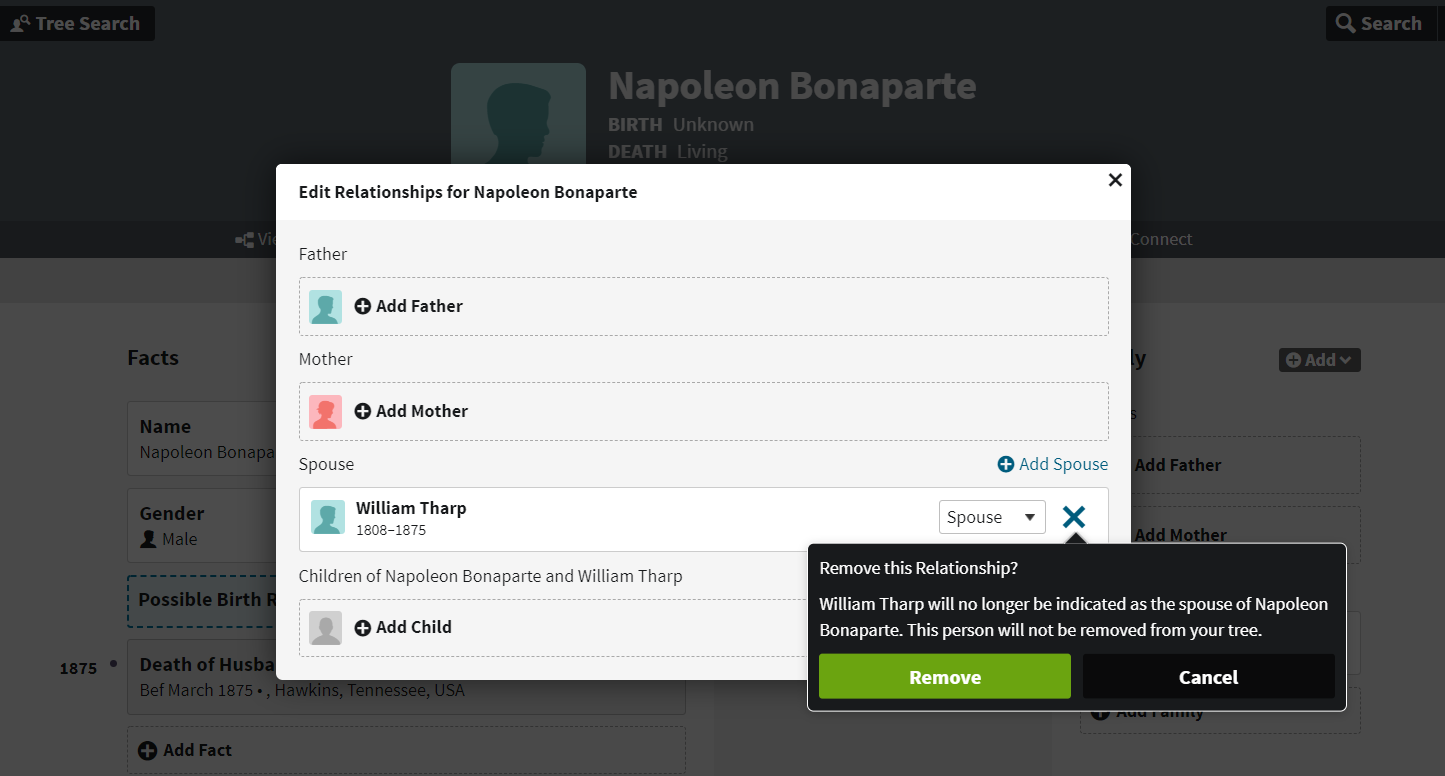
After you click remove, the person you have added will have no relationships showing in the edit relationships box. You can click the x to close this box and begin building their tree.
Label DNA Matches with MyTreeTags
After adding a DNA Match to your tree, consider adding the “DNA Match” tag to help you sort and filter matches in your tree. Ancestry created MyTreeTags to allow users to label people in your tree and filter your searches within a tree for people with that tag.
Ancestry has three default DNA tags that you can use to help identify people in your tree. They are defined as follows:
1. Common DNA Ancestor: common ancestor between you and at least one of your matches.
2. DNA Connection: This person is a relative on the path between a DNA match and a common ancestor.
3. DNA Match: This person is on your DNA Match List.
MyTreeTags also allows you to create custom tags. Custom tags could include the genetic network that the matches belong to (i.e. maternal, Grandpa Jones, Ross/Silvius) or anything that might be useful to you. If you need to search within your family tree, you can use these tags to quickly find just the people with a certain tag.
Research Like a Pro with DNA Book
To learn more about using DNA evidence in your genealogy research, be sure to get our new book (coming out soon) – Research Like a Pro with DNA: A Genealogist’s Guide. RLP with DNA has twelve chapters about using your autosomal DNA results to verify your documentary genealogy research and uncover unknown ancestors. We also discuss Y-DNA and mitochondrial DNA. The focus on the book is the process that we use in our professional work to organize DNA matches, make a research plan incorporating documentary and DNA sources, use DNA tools, keep track of information in a research log, and write conclusions. Sign up for our newsletter to be one of the first to be notified when the eBook is published. The print book will be published soon after the eBook.
Notes
[1] “Identical by descent,” International Society of Genetic Genealogy Wiki (https://isogg.org/wiki/Identical_by_descent : last edited on 6 November 2020, at 13:08.)


5 Comments
Leave your reply.