Genealogy Standard #28 states, “Genealogists attach citations to images and printouts.”[1] This is to ensure that a record will never be without its citation, but what is the best way to do this? I have tried a few different approaches with varying degrees of success, but then I tried Canva, a free online publishing tool that makes it possible to “design anything and publish anywhere.” I had been using Canva for several years to create everything from social media graphics to ancestor collages. Once I decided to try using Canva to add citations to my record images, I haven’t looked back. Canva is a user-friendly platform and it has all the right features I need to create amazing results.
Canva does require you to create a free account in order to use the platform. While Canva offers a subscription option that allows for what they term “pro” features, the free option will work just fine for this and many other things. Once you have created an account, follow the four easy steps below to create your cited image:
Step One: Create a New Design
After you are logged in to Canva, click on the Create a Design button at the top left corner of the screen. Next, choose Custom Dimensions. I always make my canvas 8.5″ wide and 11″ tall to make printing an easy option if I ever want to print the image.
The default name for your design will show as “Untitled Design – 8.5in x 11in” at the top right of the screen. Change the title to match your naming protocol for digital files. For example “1850 Census Daniel Beck Hempfield Township Pennsylvania.” This makes it so your file will already have the correct name when it is downloaded in Step 4.
Step Two: Add an Image
Next, you will add the image of the record you are citing. This can be done in one of three ways:
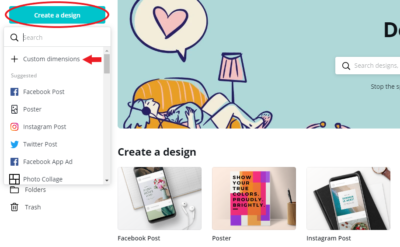
1 – Click Uploads on the menu at the left side of the screen, then choose Upload an Image or Video. Choose your file from the computer and upload it. The image will appear in the media library as shown below. Click the image to add it to your design.
2 – Another option is to simply drag and drop the image file from your computer directly onto the background.
3 – Finally, you can also copy and paste the image from another website.
Once you have the image added to your design, click and drag the corners to resize the image then click and drag the center of the image to move the image anywhere on the page.
Step Three: Add Citation
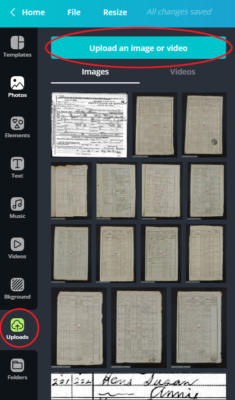
Once you have your image right where you want it, click the Text icon on the left menu of the screen. Choose Add a little bit of body text, type your citation into the text box, then move and resize the text so it’s centered above or below your image.
You can change the font as desired and add formatting like italics by highlighting the text you wish to italicize and choosing the italics icon from the menu at the top of your screen. Your cited document is now ready to download:![]()
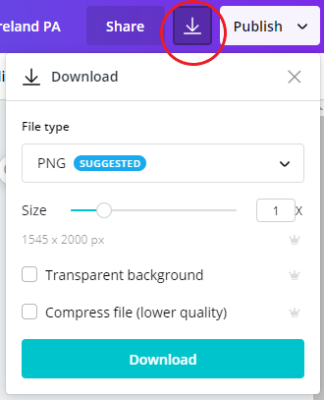
Step Four: Download the Image
Once you have the image and citation arranged the way you like, click the download arrow in the top right corner of the screen. Choose “PNG” for a high-quality digital image. If you plan to print the record, choose “PDF print” for maximum print quality. The image will go to your downloads folder. After the image is downloaded, you can move it to whatever location on your computer you would like.
Additional Options
There are additional options you can try after you get the basics down. Be creative! Canva is a really fun tool to play with! Here are a few ideas:
I like to add the title of the record at the top of the page:
![]()
You can also crop the cited image after you have downloaded it. Most image viewers have a built-in cropping feature, so simply open the downloaded image, crop the extra white space off, then save the edited image.
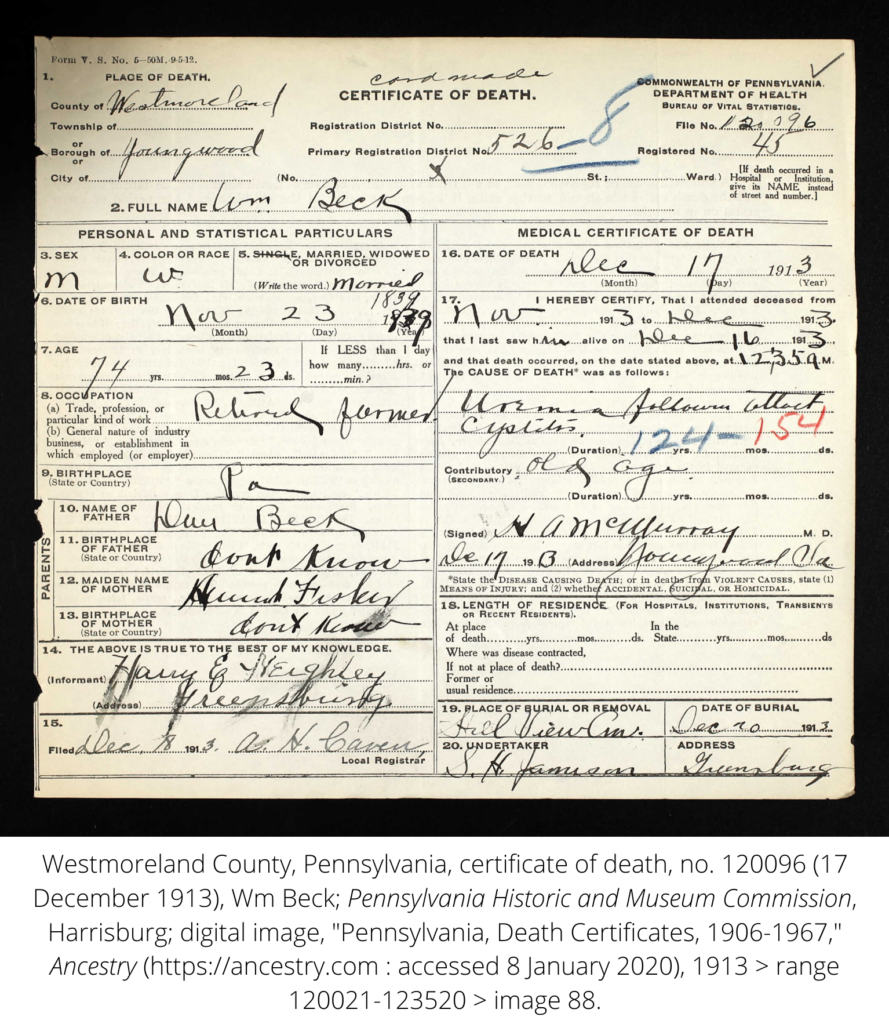
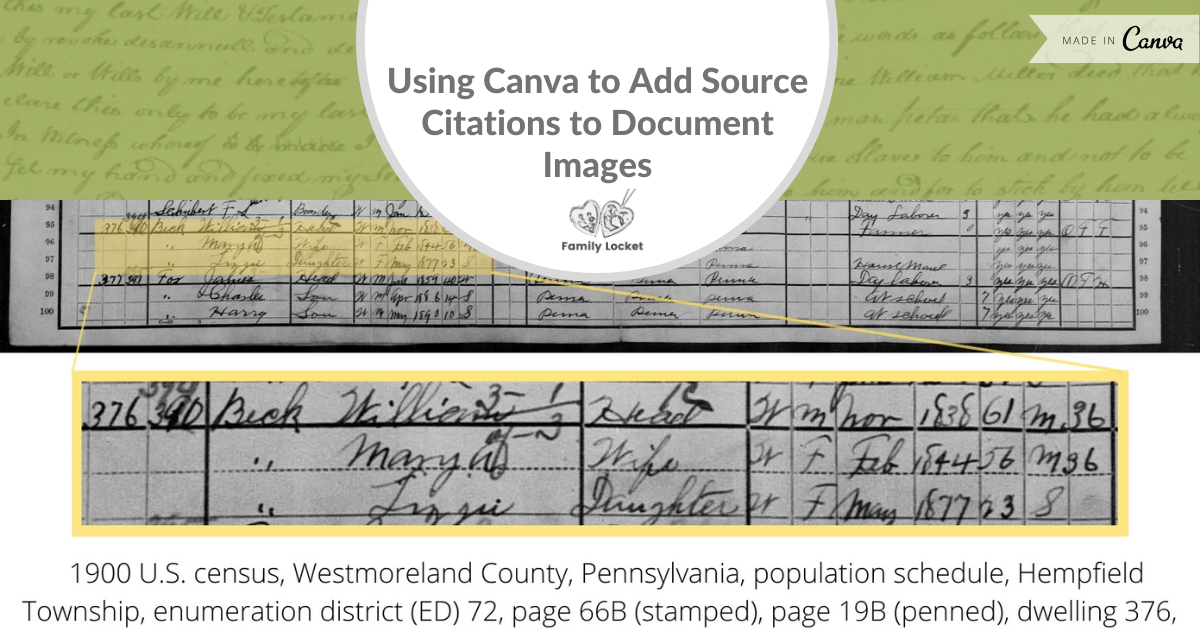
Genealogy Standard #28 also states, “images and printouts include the entire source or the entire item of interest.”[2] When including the entire image, the pertinent information can sometimes be difficult to read. I learned in my ICAPGen Level One study group that you can highlight the important part of the record by adding a box around it on the record, then including an enlarged view of that portion of the record below as shown. You can find lines and boxes to add to your image on Canva’s Elements menu.
![]()
When working on a project with records in a foreign language, you might want to add an arrow to show which record on the page is the ancestor’s record.
![]()
Finally, if you are including multiple documents in a research report, you can create a multi-page design, adding as many pages as you want to the file by clicking Add New Page below your design.
A Perfect Tool For Genealogists
Canva’s flexibility, ease of use, and many options make it a perfect tool to add to your genealogy toolkit. I hope you will find, as I did, that Canva makes adding citations to your record images a breeze.
Sources
- Board for Certification of Genealogists, Genealogy Standards, Second Edition (New York: Ancestry.com and Turner Publishing Company, 2019), 18.
- Ibid.


12 Comments
Leave your reply.