Are you challenged with visualizing how you connect to your DNA matches? DNA companies provide match lists, but sometimes we need to take control of our DNA data and organize it in a way that works for us. Creating a genetic family tree for your DNA matches might be easier than you think.
Robin Wirthlin, FamilyLocket’s new genetic genealogist shares three ways to view your DNA matches in the following article. I’m looking forward to trying each method to see what works best for me. Why don’t you do the same!
-Diana
Organize
After you have identified some of your DNA matches, it’s essential to see the “big picture” of how they are connected to you, and which common ancestors you share.
Here are three practical ways to illustrate your DNA matches:
1. Lucidchart.com is a web-based software that allows you to draw a pedigree chart using shapes and connecting lines to show your DNA matches and how they are related to you through common ancestors.
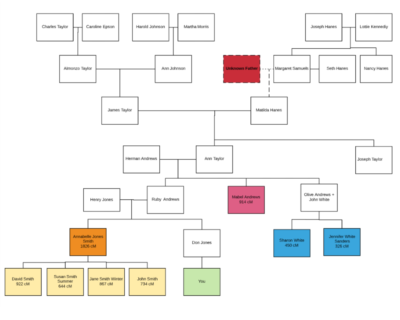
–To make a custom chart, drag a shape from the left side of the screen and drop it onto the bottom of the page. Continue to drag-and-drop shapes into a vertical pedigree chart format, adding only your DNA matches and their direct line ancestors.
–The lines are accessible from the top bar and can be changed from solid to dotted lines, and arrows or no arrows can be chosen for the endpoint of the lines.
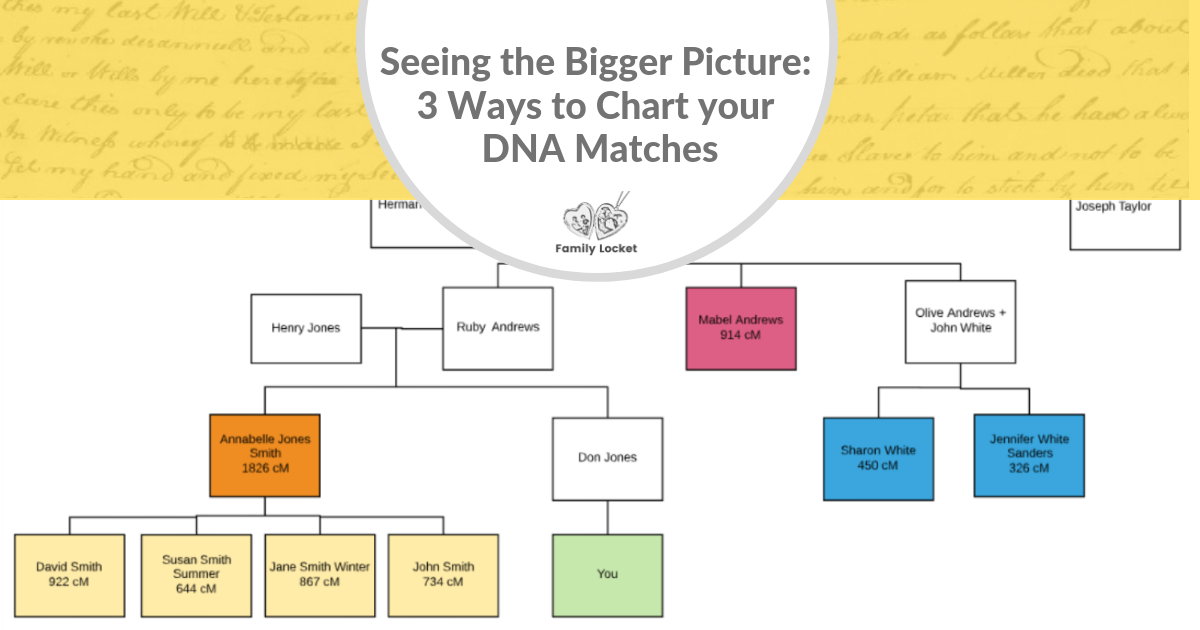
–You can fill the shapes with colors and add the name of your DNA match and how much DNA you share with them.
![]() Draw the lines in after you add the shapes; it makes moving things around much easier.
Draw the lines in after you add the shapes; it makes moving things around much easier.
The advantage of this type of chart is that you can add information from each DNA testing company to the boxes in your chart. This will enable you to utilize all the data available to you.
2. Ancestry.com – Either work in your current family tree or start a new “Genetic Family Tree.”
1. Make sure you have every living person in the family tree that you are currently working on marked as living, so their name is not visible to the public.
2. Or start a new tree that includes just your DNA matches and their direct ancestors. This helps to simplify the view and help you focus on people that help verify the genetic connection to you and your ancestors.
If you are starting a new “Genetic Family Tree,” use the following instructions:
–Click on Tree in the upper left corner of the home page, At the bottom of the drop-down menu, click on “Create and Manage Trees.” At the bottom of the page that opens, click on “Create a new tree.”

–Add yourself or the person you are helping as the anchorperson of the pedigree, shown above in brown. Continue adding parents and grandparents. If you are unsure of the names, write “Grandfather” or the appropriate relationship as a place holder.

–After adding the first deceased person to your tree, this box will open. Name your tree; it could be called Research Tree or DNA Matches, or Genetic Family Tree, etc. Un-check the green box to make your tree private. This can be helpful if you are unsure of the relationships you are charting; it will ensure that your unproven relationships won’t be copied erroneously into someone else’s tree.

–Continue building your family tree by adding people with whom you share DNA and their direct line ancestors.
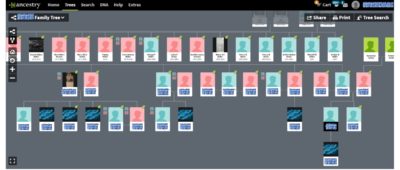
![]() Add the number of centimorgans (cM) of DNA you share with your DNA match in the suffix box, and a DNA graphic to the profile photos of your DNA matches to help quickly identify them.
Add the number of centimorgans (cM) of DNA you share with your DNA match in the suffix box, and a DNA graphic to the profile photos of your DNA matches to help quickly identify them.
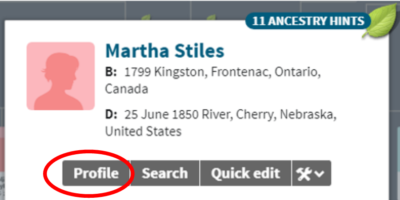
–Click on a person in your family tree, when the box opens, click on Profile.
–To add a DNA image to the gallery, draw or find a free image online, then add the DNA image to the Gallery tab on the profile page of your match, and click Upload Media. After it is loaded, click Save.
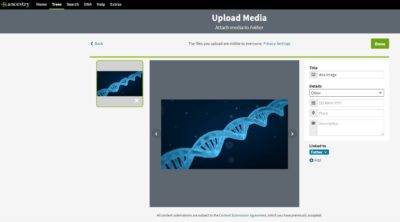
Click on the profile picture of the DNA match, the gallery box will open, instructions direct you to “select a profile image for __________,” choose the DNA symbol or photo, drag the highlighted box to show the parts of the image you prefer, or click on “show full image.” Now the DNA image will show as the profile photo, and you will be able to easily identify your DNA matches.
–As you locate the parents, grandparents, etc. of your DNA match, you can also mark them with a DNA image, or with a symbol such as an asterisk, after their name to show that they are a confirmed biological relative.
The advantage of this type of chart is that it includes all of the features of Ancestry.com family trees, and you can work on the same website with your AncestryDNA matches. You can also add information from other DNA testing companies into the notes and suffix portion of the profile.
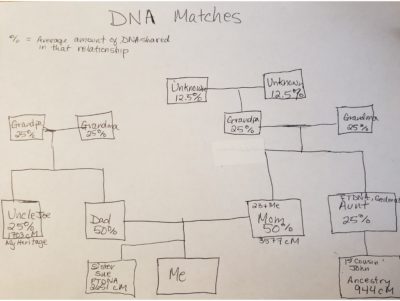
3. Paper and pencil – hand-writing is an easy and effective method of charting your DNA matches. Choose shapes that are large enough to add names, amount of shared DNA, the testing company, or Gedmatch.com. The chart below also contains the average amount of DNA shared with ancestors.
![]() Use sticky notes with the names of DNA matches and place them on the wall, window, or whiteboard in the configuration of the pedigree that you think they should go. This method gives the most flexibility but takes up the most amount of space 😊
Use sticky notes with the names of DNA matches and place them on the wall, window, or whiteboard in the configuration of the pedigree that you think they should go. This method gives the most flexibility but takes up the most amount of space 😊

The advantage of this method is easy accessibility, no extra programs to learn, and you can arrange it any way you like.
Instructions:
1. Start with yourself.
2. Add parents and grandparents. If you don’t know specific names, draw a placeholder for unknown persons.
3. Add your closest DNA match. You may have to build your family tree out to where your DNA match connects with your ancestors. If you don’t know who they are, follow the steps in this previous blog article: (Understanding and Using Your DNA Results – 4 Simple Steps)
4. Add your next closest match, and the next, and the next and so forth. If you know the branch of the family where you want to focus, start building the tree in that direction.
Organizing and charting your DNA matches will help you effectively Research Like a Pro with DNA.
Other articles in the Research Like a Pro with DNA series:
Step 1 Take a DNA Test: Which DNA Test Should I Take? and DNA-Recommended Testing Strategy
Step 2 Assess: Understanding and Using Your DNA Results – 4 Simple Steps
Step 3 Organize: Seeing the Big Picture: 3 Ways to Chart Your DNA Matches – You Are Here
Step 4 Research Objective: What Do You Want to Know? 3 Steps to Focus Your DNA Research
Step 5 Analyze your Sources: DNA Sources, Information, and Evidence: Sorting it All Out
Step 6 Locality Research: Where in the World Has My DNA Traveled? DNA and Locality Research
Step 7 Research Planning: Genealogy Research Planning with DNA
Methodology and Tools to use as you plan your research:
– Charts for Understanding DNA Inheritance
– Clustering or Creating Genetic Networks
– Pedigree Triangulation
– Chromosome Browsers
– Segment Triangulation
– Chromosome Mapping
– DNA Gedcom
Step 8 Source Citations: DNA Source Citations
Step 9 Research Logs: DNA Research Logs: how to Keep Track of Genetic Genealogy Searches
Step 10 Report Writing: DNA Research Reports – the Ultimate Finish
Step 11 What’s Next? Continue Your Research & Writing, Productivity, and Education
Save to Pinterest:


11 Comments
Leave your reply.